Most Flats Don’t Cause Crashes…
 …but then again, there are some that do. Maybe the flat, and crash, could have been avoided with one proactive thing we can do regularly: inspect your tires after every ride. Of course, there’s no way to prove that any one flat was avoided by any preventive measure. Flats that don’t occur can’t be known. But I have reduced my flats with a post-ride inspection protocol. While this is anecdotal, I’m convinced.
What seemed to be happening fairly regularly was next morning flats. I would finish a ride with tires inflated as solidly as when the ride began. The next morning, raring to ride a new day, I find that I have a flat. Eventually, I concluded that it must have been caused by one of those pesky tiny glass shards that got stuck in the tire days or weeks earlier, and worked its way through the rubber, through the cord, where it began penetrating the tube. So, I started inspecting the tires after every ride a few years ago and the number of next morning flats decreased almost to none at all. But you should know that a casual inspection will not catch all the little things since they don’t stick up out of the tire waving the white flag of surrender. A careful and close inspection is required. ✎
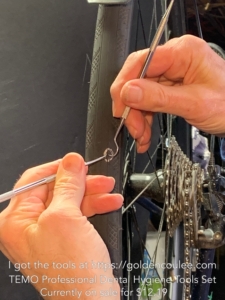
What you’ll need: reading glasses or better than 20/20 vision, a lot of light shining directly on the tire and something with a sharp point like a dental pick (ideally). I haven’t gotten that pick yet but I have used a 1.5-inch finishing nail which has a good point.
Figure out the most comfortable and efficient method that gets your eyes book-reading distance or closer without blocking the light. Start rotating the wheel at the valve stem or other mark so you know when you’ve inspected the entire circumference. A glass shard will make a tiny sparkle in the light if it is near the surface. Gently and carefully use your pick to lift it out.
Sometimes shards hide in small cuts. From several perspectives, look closer at the cut by gently opening its edges with your pick so light can get inside. If you see a shard hiding in a pocket of the cut, carefully use your pick to get under it or if you can’t get under it, gently scrape at it several times to dislodge it. You may need to try several times at different angles, being careful not to drive it deeper.
Sharp pebbles also get into the rubber. You’ll have to wipe off the surface debris stuck to the tire to improve chances of spotting those. Tiny pebbles also get into cuts. The light will be important in spotting them. Remove them. They can work their way deeper also.
Cuts in the tire tend to accumulate debris that could eventually compromise the tire, fill them in with E6000. I experimented with several compounds and found this product to be the best at filling the cuts, remaining flexible, and staying put after the recommended curing time. It is available in black.
(Editor’s note: Last-minute update)


I got tools at https://goldencoulee.com TEMO Professional Dental Hygiene Tools Set. Currently on sale for $12.19.
Alan Mevis, Member at Large, Safety Committee Chair
