
Are Clipless Pedals More Dangerous?
[Please note that to write this article, I had to ignore many variations and options available for all the pedals and categories. A full-year, 300-level, college course could probably be taught on the subject.]
Clipless pedals
Have you thought about getting clipless pedals to replace your platform pedals or toe clip pedals, but been afraid they would increase riding risks? Do you worry that in an urgent situation your clipless pedals are not going to release quickly enough? Well, you’re not alone. So, here’s some information that may surprise you or may clear up the matter for you. ✎
Platform pedals
First, there are three basic types of pedals: clipless, platform and toe clipped. Clipless pedals are spring loaded mechanisms designed to lock on to a cleat attached to the bottom of cycling shoes made for that purpose. Some confusion about the term “clipless” is understandable given that riders often use terminology such as “clip-in” or “clip-out” with clipless pedals. “Clipless” distinguishes it from the low-tech toe clip (clipped) pedals which consist of a metal or plastic cage attached to the pedal into which the toes of your shoes are inserted and tightened down by a strap across the bridge of the foot thus securing the front of the foot to the pedal. This cage and strap device is used with platform pedals of a certain type. Platform pedals come in a variety of styles designed for specific riding: beginners, urban, commuter, mountain, BMX, and other obscure cycling endeavors. Toe-clipped pedals are currently out of favor and now rarely seen. And, there may be good reasons why.
Toe Clips
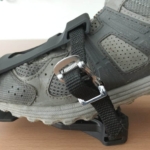
Toe clip pedals
Toe clips (cage and strap) have been around for a long time. They were mostly used by more serious cyclists, those who wanted to pedal more efficiently and with more cranking power, and by professionals. These are many of the same reasons riders in more recent times have been using clipless/cleated pedal systems. And toe clips, like clipless, have a learning curve to feel comfortable and proficient riding with them. Beyond that, there are no real similarities.
The good news about toe clips is the price. They’re inexpensive, require no special expertise to install and usually don’t require special shoes. Almost any pair of shoes will do. Also, they’re inexpensive to replace, which is important when you consider that clipless systems wear out to the extent that over time you may have to replace everything, although not necessarily all at once. But, since this is a safety article, I won’t dwell on differences other than in the realm of outdoor cycling (in other instances, toe clips may be preferable).
[While reading this, keep in mind that unless both feet slip out of the toe clips while in motion, you will normally have one foot in a toe clip and only have to get the other into or out of the clip as you start up or stop.]
You’re riding along with your shoes in toe clips, and you previously tightened the straps because you wanted to maximize the toe clip benefit (tightening the strap is not required if you don’t care about maximizing the benefit and you could even do away with the strap and still get a slight benefit). Then comes a red traffic signal or worse, some emergency. You must remove at least one shoe from the cage, but it’s in there too tightly. You could reach down and try to loosen the strap or spend time trying to wiggle your foot out (if the strap is too loose all the time, your foot could slip out and off the pedal). Of course, this takes some time and attention, neither of which may be available in the moment. Assuming you were successful in removing the shoe from the toe clip, the clip’s weight rotates the pedal, so the clip is underneath. So, when you start up you have a choice between quickly rotating the pedal and slipping the toe of your shoe into the cage all in one continuous motion and tightening the strap again (what you mastered in the learning curve) or just pedaling on the non-clipped side. The choice can be made for you if you fail the insertion in the first instance and trying again might distract your attention or present other hazards. Thus, you might wait for a safer opportunity. But riding on the non-clipped part of the pedal has problems and hazards of its own: the cage and strap can drag on the pavement with each rotation causing wear and tear, or worse, getting caught on something in the road surface with the potential of taking you down. For similar, but more numerous, hidden, and serious reasons, toe clips are not recommended for off-road/mountain biking.
One consideration with a clip-and-strap setup that is a disadvantage compared to clipless is the precision of locating your foot on the pedal. The clip-and-strap does fairly consistently locate your foot approximately in the same place each time and will probably work for most riders. But the clipless system is adjustable with precision by virtue of the positioning of the cleat on the bottom of the shoe which may improve riding comfort and may even help with knee pain. However, consulting a bike fit specialist may be necessary to get optimum positioning (another expense). Also, clipless pedal systems have an adjustable “float” that allows you to move your heel a bit while riding to keep from getting stiff.
It’s in the realm of stationary pedaling (gyms, home exercycles and trainers) that toe clips make more sense than clipless or platform. Trainers are the at-home device on which to mount your bike temporarily. You could have a bike with toe clips dedicated to indoor training or just change out your clipless pedals for toe clip pedals for indoor training. But, unless you really need to wear your sneakers or slippers, clipless work on trainers too.
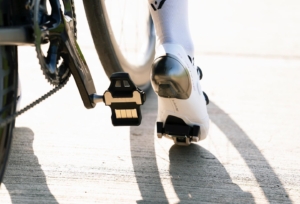
Clipless Pedals
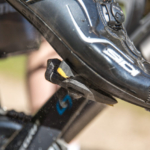
Clipless pedals
By now you probably understand that clipless pedals mechanically attach your shoe to the pedal via a lock-and-release interface between the pedal and cleat attached to the bottom of your shoe. Usually, the pedals and cleats come in one package. The shoes offer an immense variety of choices, but basically it comes down to road shoes or off-road (mountain bike) shoes. The former are not walkable, except like into the coffee shop, awkwardly placing more weight on the heel than on the ball of the foot where the cleat is located (you don’t want to wear out your cleats prematurely), but otherwise not recommended. (For my clipless system, “café caps” were available to fit over the cleat, thus walkable. I recently replaced those cleats with ones the maker thoughtfully designed to be recessed, thus walkable without the hassle of the “cafe caps.”) The sole of the latter is recessed where the cleat is attached, mostly protecting the cleats from unusual wear, so designed to be walkable. However, you probably shouldn’t hike around or take your evening stroll around the neighborhood in them.
For the most part, fear of increased riding risk is associated with having your feet locked onto the clipless pedal. But I’m here to tell you that clipless pedals may be safer than either toe clips or platform pedals. “Hogwash,” you say. How can that be? Well, say you’re cruising along, and you hit a bump or hole in the road that causes your foot to slip off your platform pedal. Your foot hits the pavement at 15 miles per hour. Hopefully, you’re able to right your bike and restore balance. If you have a clipless setup, your feet stay put, affording you more balance, control, and a greater ability to remain upright. Regarding toe clips, some of the toe clips’ risks were explained, supra. You can make your own comparisons.
You’re not convinced? You still can’t get past the absolutism of the lock, right? Well, the locking mechanism is usually controlled by a spring which can be adjusted to allow very easy release or, on a continuum of adjustment, to require more force to release. Usually, the release is accomplished by pushing your heel outward. Downward pressure on the pedal is how you get locked in when you’re starting up. This requires the cleat to be in the correct position over the pedal, which brings up the learning curve and other factors. One caveat is that some clipless systems do not have an adjustable spring. These allow for easy release. For obvious reasons, it’s a safer option for off-road. And there’s no reason why you can’t use this type for road cycling. My first clipless system was of this type. Now it’s on my rain bike.
THE LEARNING CURVE
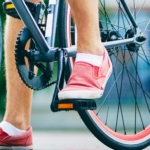
 Platform Pedals
We never really thought about the pedals when we started riding as kids. We just got on and pumped those pedals, which invariably were platforms of some sort. There is a wide variety of them at various price points, but not really expensive, unless you’re a serious mountain biker. You can find them specialized for various kinds of riding, and some, like off-road/mountain bike pedals, have grippy designs to hold on to the shoe for reduced slippage. There’s no reason why you can’t use one of those on a road bike. We intuitively know where to place the foot on such a pedal: ball of the foot over the center spindle. Wrong positions just don’t feel right. Your body mechanics tell you so.
Toe Clip Pedals
If you’re new to toe clips, it’s a good idea to practice in a stationary position and then in a safe environment before going out on the street to ride. Start off with a loose strap. Wear the shoes you expect to ride in most of the time. A grippier flat sole is best because it’s needed to rotate the pedal so the cage resting on the underside is on top, and as it gets there, stop the rotation at a point where you can insert your shoe into the clip. The pedal should have something like a nub protruding slightly at the center of the edge of the pedal to help you start the rotation and get it to the insertion position.
Clipless Pedals
First do some research so you know what’s available. Then talk to someone at a few trusted bike shops. Have the experts set it up for you, and be sure to discuss with them the appropriate spring tension and float. Since your cycling interests are mainly recreational, get a looser tension on the spring, especially at first. You can have it tightened up when you get proficient, if you really think you need it. You probably don’t. At home, find a safe level spot to practice. Put on one of your new cycling shoes, and on the opposite side of your bike place a single step stool or equivalent so you can keep yourself and the bike stationary and upright. Start off with the pedal at six o’clock. To maintain stability, apply the rear brake and practice getting the cleat and the pedal matched up. Put progressively more weight on the pedal until it snaps into place. Continue that until you can do it without thinking about it. Then put the pedal at five o’clock (depending on which pedal you’re working on and your point of view, you may be seeing it as seven o’clock), and with enough pressure on the rear brake to prevent rolling forward, repeat the process, but try to add some leg muscle strength to get it to snap in. After you got that working, go to four o’clock, with more pressure on the rear brake, repeat the process. Then repeat the process with the other leg and pedal. Generally, when in motion, it will be in the range of three to six o’clock where the snap-in will occur. And while riding, you will be able to apply your weight, muscles, or both, to click in. Now, find a safe out-of-doors place to practice starting up. With the leg you feel comfortable using to start up, poise the shoe and cleat over the pedal at three or four o’clock, and apply weight and pressure on that pedal. Get the bike rolling, and if it doesn’t snap in, stop and repeat until it works and becomes second nature. Obviously, in this process you will also have been practicing the release. And you will know how it’s accomplished because you’ve been practicing pushing your heel out to the release point. When in motion, I find it easier to release with the pedal at twelve o’clock. Now that the bike is in motion with the first foot securely in the pedal, practice snapping in the other foot which is best accomplished in the rotational movement of the crank rather than while coasting.
Keep in mind that clipless pedals require more care and maintenance than others. Aside from greasing the pedal bearings, the spring mechanism will require lubrication at regular intervals. It’s important to avoid getting dirt and debris in the mechanisms, and one way to help is to use non-oily lubrication. Try a dry lube like Finish Line’s Pedal and Cleat Lube. However, default to whatever the manufacturer recommends.
CONCLUSION
Now you know it. Your fears are surmountable, and you understand the risks more fully. And you’ll probably not change a thing. But at least you’re armed with the knowledge you need to deal with the risks associated with your pedals.
Alan Mevis, Member at Large/Safety Committee Chair