
Safety: Tools
 I am going to focus on the tools you need to carry on the road as opposed to tools for home before the ride.
TOOLS FOR A DAY RIDE: THE ABSOLUTE MINUMUM
- Tire Levers. I could maybe get a tire off with a flat-bladed screwdriver, but there is nothing like having a tool for the job. Using the screwdriver, I could easily damage the tube beyond repair, and I might damage the rim as well. Tire levers are inexpensive and essential for safely removing a tire from the rim so I can get at the tube. I try NEVER to use the tire levers to finish re-installing a tire. It is easy to pinch the new tube between the lever and the rim, tearing another hole in the replacement (or freshly patched) tube. HINT: Carry a small piece of a bar of soap. If the tire is hard to remove or re-install, moisten the soap sliver (use your water bottle or a nearby puddle, or whatever…). Run the moistened soap piece along the bead of the tire to lubricate it. The tire should slide right off. ✎
- Spare Inner Tube(s). Though an inner tube is not really a “tool,” it is, nonetheless, part of my essentials. I carry two. Most shops will use a “tube duster” before putting a new tube in a tire. A tube duster in the shop is just a large plastic tub (think 5-lb. margarine tub) with some talcum powder in it. Some people are allergic to talc, so cornstarch can substitute. They just throw the deflated tube in the tub, add the talc, close the lid, and shake. The talc keeps the tube from sticking to the inside of the tire, so it is easy to remove when the time comes. I have a tube duster at home, but on the road, I carry my tubes in a small plastic bag with talc in it. I also throw a couple of lightweight, nitrile exam gloves in the bag. Who wants to get dirty hands changing a nasty, wet tire?
- Patch Kit. Unless you use solid tires, you will, at some point, have a flat. Even if I carry a spare tube or two, it is possible, even likely, that at some point I will have one more flat than I have tubes. In fact, it is so probable that it has happened. No ifs, ands, or buts—I CARRY A PATCH KIT. They are cheap and contain glue, patches in a couple of sizes, and a piece of abrasive for roughing up the surface of the tube. Get one, and learn how to use it. Practice in the living room. Don’t be caught trying to read the instructions by flashlight in the rain. I also have purchased whole boxes of just patches—the little ones. The patches that come in most kits are 1” (25.4 mm) in diameter. The tubes in my tires are 700 X 23-25 mm, meaning that the patch is as big as the cross section of the tube, so I buy boxes of 15 mm patches. If the hole is bigger than that, I can use one of the larger patches, but I don’t like to.
- Pump/CO2 Cartridge. So, once I replace or patch the tube, I need to get air into it. A CO2 cartridge or two or a pump is necessary. The little cylinders are handy, but what if I have more flats than cylinders? So, I don’t carry the CO2 at all. I carry only the pump. There are lots of good pumps that mount on the frame or that can be stowed in a bike bag. My favorite, and the one I carry, is the Topeak RoadMorph™, and has a little pad that folds out that I can put my foot on, so it turns into a floor pump. It also has a hose that connects the pump to the valve, so I don’t have to hold the valve while I pump, risking breaking off the valve. It has a gauge, so I know for sure when it is up to pressure. And almost all pumps nowadays can be converted to inflate tubes with Schrader valves (the one like on a car) or the skinny metal Presta valves found on most road bikes.
- Wrenches. Bolts can vibrate loose. If you notice a loose one (on your bike or someone else’s) a set of Allen wrenches will usually be all you need to get it tightened back up. Just this last weekend, one of our riders had his crank bolt loosen up. I carry a complete set, from 2 mm to 8 mm. You should carry at least a set that will fit all the socket head bolts on your bike. The most commonly used sizes are 4 and 5 millimeters. Some bolts that hold the saddle in place are 6 mm, and stem bolts are usually 6 mm. I also carry a small (6”) adjustable wrench. Not for any of my bikes, but I have come across others who have flats and have bolt-on axles, not quick releases. I also carry a set of spoke wrenches, one that fits my bike, and one that is a common size. If I break a spoke, I have to loosen a couple of spokes from the other side of the wheel so that, though the spoke tension is now uneven, at least the rim is true enough to get through the brake pads.
TOOLS FOR A DAY RIDE: NICE TO HAVE
- Chain Tool. In over twenty years of riding, I have used my chain tool only four times. Only once was it to fix a problem on my own bike. But despite using it once in every 17,000 miles, it was nice to be able to get somebody else, as well as myself, back on the road. Who can ride with a busted chain? But before I had my first encounter with a broken chain, I had the chief mechanic at a bike shop show me how to use it!
- Extra Links/Extra Pins/Quick Link. Depending on how badly a chain is mangled, I might want to replace a segment or two. Of course, I can just shorten the chain. Now, I always try to avoid using odd gear combinations like using the big chain ring and the big cog in back, but if I should accidentally slip into that combination with a chain that is too short, I would be in danger of tearing the rear derailleur right off the bike. (I saw it happen. Not to me but to a nice lady twenty miles from the finish on a 100- mile ride.) Reconnecting the chain after removing or adding links can be problem, too. I carry extra pins. On some chains (Z brand, for instance) I can drive the chain pin part way; then, using the chain tool again, drive it back into position. Shimano chains, on the other hand, have pins that should not be re-used in this fashion. I carry a handful of extra pins as well as about six extra segments of chain.
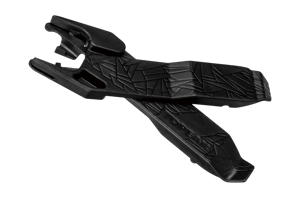 But I have to be careful. All my bikes use nine-speed chains, so all my spare pins are nine-speed pins. But 8, 9, and 10 speed chains are different widths, and, therefore, take DIFFERENT LENGTH pins. Not interchangeable. So don’t even think about it. An alternative to replacing pins, though, is to carry a couple of spare “Quick Links.” They replace a link in the chain. To remove one of those, however, requires the patience of Job and a pair of long-nose pliers or a special tool. Topeak has just come out with a special tool called Topeak Power Lever™ that does duty as the special pliers as well tire levers. I intend to replace my tire levers in my tool kit with this, and I will have the special pliers built in. See image (right).
 - Zip Ties. Two or three zip ties of different lengths and thicknesses can hold something in place until I get home.
- Duct Tape. One of our members carries a few yards of duct tape wrapped around the stub of a pencil. Duct tape is like THE FORCE. It has a dark side, a light side, and it holds the universe together. Like Zip ties, duct tape has myriad uses, such as booting a tire or patching a shoe or a tent.
- Tire Boots. And while recalling the subject of patches, sometimes it is not just the tube that needs patching. Sometimes the tire itself is compromised. Anything that is fairly stiff and strong and thin that will fit in between the tube and the tire to lend a little strength to the tire can serve as a boot. Anything that will plug a hole in a tire to keep the inner tube from blowing out will do. A dollar bill can work; so can a piece of leather, or a piece cut from another tire, or a piece of plastic found along the road. Park Tool makes an emergency tire boot (TB-2™) that is fairly heavy plastic patch with glue on one side to hold it in place between the tire and tube. I never leave home without one.
- Spare Tire (folding). On occasion, a tire becomes so damaged that it just really cannot be fixed even with duct tape or a specially designed boot. For such cases, I carry a folding tire that will replace the regular tires I ride on. Most bike tires have a heavy cable along the bead (the part that connects with the rim). A folding tire has a Kevlar string in place of the metal cable. This permits it to be folded up and carried in a bike bag or bottle cage. If I get a flat in the dark in the rain, I don’t want to be checking the tire for glass, and I don’t want to take a chance that I missed the tiny piece of glass or wire that caused the flat in the first place. I can just swap out the regular tire and tube and be confident that the problem is fixed. I can look for the culprit in the living room, then put the regular tire back on.
TOOLS FOR TOURING: ALL THE ABOVE PLUS A FEW 😊
- Spare Spokes. Did you ever break a spoke? Have you ever been with someone who has? This is a pain, especially if I am two or three days from home and a long way from the nearest shop (which might be closed anyway since I have been riding all day and it is getting late). The quick and dirty emergency fix on a day ride, is just to loosen enough spokes opposite the one that broke so that the wheel doesn’t wobble too badly. But this weakens the wheel, and, on a tour, I am putting extra stress on the wheel, so I need to be able to replace the spoke. But all spokes are not the same length, and length is critical. A millimeter or two too long and the spoke could puncture the tube. Too short, and it may not have enough thread engaging the nipple to be tightened properly. Gotta have the right spoke. But wait! Most bikes will have spokes of three different lengths. On the rear wheel, for example, the drive-side (the side with the gears) spokes are shorter than the spokes on the other (non-drive) side. This is true on just about every bike with external gears. Some exotic hubs have flanges of different lengths to compensate, but these are very rare.
 Also, the typical flanges on the front hub are smaller than those on the rear, so those spokes are usually longer than the ones in the rear. Fortunately, the spokes are the same length on each side. Unless the bike has disc brakes! So, I used to carry three spare spokes.
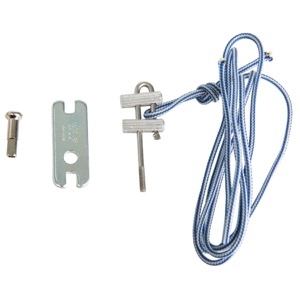
 - Fiber Fix. Did I just say I “used to carry” three spokes? I did indeed. Now I carry a little goody called a Fiber Fix Spoke Replacement™. According to the ad, it will a) Replace any spoke on any wheel size, front, or rear; b) permit the rim to be trued properly; and c) not require you to remove the cassette or freewheel to replace a drive-side rear spoke. It is just a Kevlar™ string that completely replaces the broken spoke. Nirvana, and for only fifteen bucks! The little kit includes the string, preplacement nipple, and a special adjusting cam. See image (right).
- Shimano Lockring Removal Tool. Despite the claims of the Fiber Fix people, I am skeptical about not having to remove the cassette to replace a drive-side rear spoke. I have never had to do this on the road, and I know people who have workarounds so that a broken drive-side rear spoke can be removed and a new one threaded in.
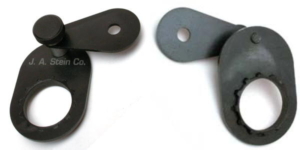 Nonetheless, I can foresee that I might have a problem with that. So, I also carry a spiffy little thing made by Stein Tools called the Hypercracker™ that weighs about an ounce. In the shop, they use a chain whip, lockring tool, and a 10” adjustable wrench. The ones I have at home weigh 2 lbs. 3 oz. Not something I want to carry around on a long tour. The Hypercracker™ replaces all that and uses the power of the gears to loosen the lockring ON THE BIKE. See image (right). It works!
Dave McQuery, Member at Large